So, you’re ready to get started learning web development - but how do you practice it and follow along? One part of learning web development that is commonly overlooked is how to actually do it. Sure, you might know HTML, CSS and JavaScript off the top of your head, but how do you actually run it?
Let’s have a look over how to actually do web development while you’re learning
Device
Seriously, use a computer. Phones will definitely not work, as the screen is too small, the wrong size and many of the characters you will commonly use in programming (such as ;, < and >) are hard to type on a phone keyboard. Additionally, most phones don’t give you direct access to the filesystem (if you remember from my last post, websites are actually just folders with files in them) or the terminal. Yes, there are probably apps that you can get but it will all be much more complicated. Seriously - stick with a computer.
The same thing goes for tablets - the screen is slightly bigger and is landscape, but you still can’t access the terminal or filesystem and many common programming characters are still hard to type.
Operating system
I recommend a Unix-based operating system, meaning either macOS or Linux. The reason for this is that they both have a Unix terminal. Unix terminals are more widely used within the programmer community, therefore have more support. I also (admittedly biasedly) find Unix terminals easier to use.
If you are a beginner programmer or haven’t had much experience with the Unix terminal, I would probably recommend either MacOS (Mac) or Ubuntu Linux. This may be a bit in advance as you don’t really need a terminal when learning web development, but later on if you start running servers, using NodeJS etc. it will be helpful to have a Unix terminal (also, any of my posts using the terminal will be for Unix operating systems).
Terminal
You can use the default system terminal, or you can install my favourite terminal program called Hyper.
Code editor
As I said in my last post, websites are simply a collection of files. As such, you will be writing HTML, CSS and JavaScript in files. You can use your system’s text editor for this, but I highly recommend a code editor as it will highlight code, help you write it and will be generally set up to code.
There are many code editors out there. I use Brackets, as it is specifically made for web development (but not limited to that) - their slogan is (quite ironically) Code The Web. I also like their clean user interface, and how simple it is to use compared to some other code editors where trying to use them is a learning task in itself. Other good code editors include Atom and Visual Studio Code. Fun fact: I’m actually writing this post in Brackets right now.
Brackets set-up
Okay, you probably know how to install an application - download brackets from brackets.io. Once it’s all installed and you’ve opened it up, there are a few extensions I recommend installing.
Extensions basically extend what Brackets can do. To install an extension, click on the brick icon in the bar on the far right (oops, I didn’t mean that to rhyme). Then in the Available tab, search for and install these extensions:
| Extension Name | Description |
|---|---|
| Beautify | Format JavaScript, HTML, and CSS files |
| Color Highlighter | Color highlighter for CSS, LESS, SCSS, SASS and Stylus |
| Indent Guides | Show indent guides in the code editor |
| Emmet | High-speed HTML and CSS workflow |
Any great extensions that I missed? Let me know in the comments. You can also install a theme if you wish, but I think that the default theme is pretty nice anyway.
Once you have these extensions installed, open a project folder by going File > Open Folder.... Now, all the files in that folder will show up in your file tree on the side, so you can open files from your website folder.
Running your code
To understand this better, I highly recommend reading my post How the internet works if you haven’t already. Basically, your website is contained within a folder. An example folder might look like this:

As a standard, the home-pages of websites are always named index.html (well not always, but you should get into the habit).
I’m going to get you to join in at this point. Open up Finder, Libraries or however you access files on your computer, and make a new folder called website (wherever you want, but remember where you put it). Now, in Brackets, open up the folder (File > Open Folder...) you made. Make a new file (File > New) and type in the following HTML:
<h1>I am being opened from the filesystem!</h1>
<p>Yay! You're ready to do web development on your computer!</p>
Now save (File > Save) the file as index.html in your website folder. Next, open up your folder using Libraries/Finder etc. You should see your index.html file in it.

Open the index.html file. It should open in your browser, but if it doesn’t then right-click, select Open With and then choose your browser. Once it’s in your browser, you should see something like this:

You will see that your url looks something like:
file:///path/to/folder/website/index.html
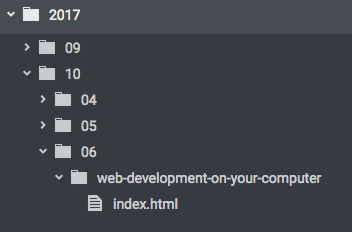
This is an actual URL! It works just like an actual website on the internet would - https://codetheweb.blog/2017/10/06/web-development-on-your-computer/index.html is the same, except that file:// is replaced with https:// and the path is /2017/10/06/web-development-on-your-computer/index.html. This means that there is actually a file structure like so:

The reason that index.html is probably not in the URL of this page is because the server is set up so that if you visit a folder, it serves you the index.html file from that folder.
As you can see, there is essentially no difference between how websites work on the internet and on your computer, other than no-one else can visit the one on your computer.
So, now you know how to preview websites on your computer! If you were to change the HTML and save it, you would need to reload the page to see the changes.
Conclusion
Hopefully you know have a full web development set-up! This will be great for learning web development, as if there is no way to run your code then you can’t see the result. You’re all good to go, and ready to start. I encourage you to follow along in all of my posts - it really helps you learn the language. If you need any help setting things up, I’ll be happy to help you in the comments. I hope you enjoyed this article, and if you liked it don’t forget to subscribe and share with your friends.