The syntax of a language is how it works. How to actually write it. Learn HTML syntax in this article…
The building blocks of HTML are called elements, and the building blocks of elements are tags. When they are put together, they make a website - sort of like atoms and subatomic particles (HTML elements are not related to scientific elements of course, just one of my weird analogies). Let’s get started!
HTML Elements
Ok, I’m going to show you a bit of code. WHAT??? Don’t panic. You don’t have to understand what it all means, I will explain below:
<h1>Blog Posts.</h1>
<div class="controls">
    <input type="number" id="first" placeholder="First" oninput="inputsChanged()">
    <input type="number" id="last" placeholder="Last" oninput="inputsChanged()">
</div>
<span class="total-word-count"><b>Total Word Count:</b> <span id="word-count">0000</span></span>
<table>
    <tbody>
        <tr>
            <th>Post number</th>
            <th>Post Date</th>
            <th>Post Name</th>
            <th>Word count</th>
        </tr>
        <tr>
            <td class="post-num">#1</td>
            <td class="post-date">Friday 29 September 2017</td>
            <td class="post-title"><a href="https://codetheweb.blog/welcome/" target="_blank">Welcome to Code The Web!</a></td>
            <td class="post-words">1373</td>
        </tr>
    </tbody>
</table>
<br>
See? You survived (I hope). For starters, don’t worry about what any of this means - we are only worrying about the structure at the moment.
An element is basically bit of content (text), surrounded by HTML tags (I will go into this more later). The tags tell the browser information about what is inside it. For example, <h1>Blog Posts.</h1> is telling the browser that “Blog Posts.” is an h1 element - a type of heading. You don’t need to remember that, I will go into it more in a later article.
An element refers to the content as well as the two tags. This is an example of an element:
<td class="post-num">#1</td>
Elements can be nested inside each other. When nesting elements, it is usually good to put the elements on new lines, and indented correctly. There are some exceptions, such as
<td class="post-title"><a href="https://codetheweb.blog/welcome/" target="_blank">Welcome to Code The Web!</a></td>
Note that putting nested elements on new lines and indenting are not mandatory, they are just what we call good code practice. Good code practice is sort of like etiquette for programming. The aim of good code practice is to make your code easier to read and easier for others to understand (this is especially important when collaborating on large-scale projects).
An element inside another element is called it’s child. Similarly, an element’s surrounding element is called it’s parent element. In the example I gave right near the top, <th>Post number</th>, would be the child of <tr>, which is the child of <tbody>, which is a child of <table>. We can represent this as:
table > tbody > tr > th
Note that this is not code. It is simply an easy way of visualizing how the elements are nested within each other.
HTML Tags
As I mentioned earlier, tags are the bits of code surrounding the content, such as:
<p class="test"> ... </p>
Tags are always enclosed within < and >.
Types of tags
Tags fall into two categories: Opening and closing.
See the example below:
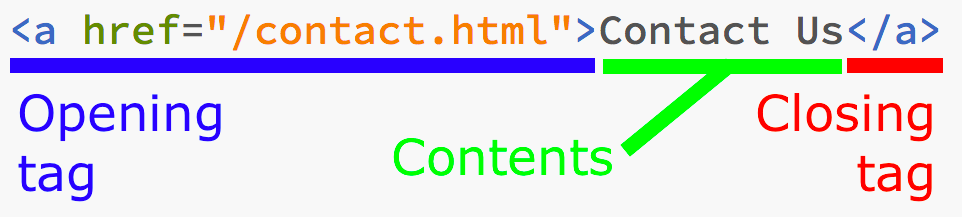
Opening tags always follow the basic pattern of <x> where x is the type of element (eg. <p>). Opening tags can also have attributes (which we’ll get into in a sec). Every single element must have an opening tag at the very least.
Closing tags are what comes after the contents of the element. They always follow the pattern of </x>, where again x is the type of element (eg. </h1>). Closing tags always look the same (apart from the element name of course) and cannot have attributes.
If an element doesn’t have anything inside it, it doesn’t need a closing tag. Take this an example:
<img src="/assets/img/posts/structure-of-html-tags/tag-structure-1.png">
As it has no contents (only attributes), it doesn’t require a </img> closing tag.
Attributes
As well as having contents, an element can have attributes. Attributes store additional data about the element, and are stored in the opening tag. For example:
<h1>Code The Web</h1>
Here, all we know is that it is an <h1> element. Now, this is what it looks like when we add attributes:
<h1 id="code-the-web-title" class="banner-title" onclick="titleClicked()">Code The Web</h1>
Now we know much more information about the element. We know it’s id and class (which are used to style it using CSS), and we also know to run the JavaScript function titleClicked() when we click on it (we will get into that much later). As you can see, attributes can tell us much more about an element. The syntax for attributes is:
<h1 attribute="value" otherattribute="othervalue">
The quotation marks are very important, so don’t forget them! Also note that there is not a space on either side of the equals signs (there must be spaces between attributes though).
Conclusion
Let’s consolidate what we know about HTML tags and elements into this diagram:
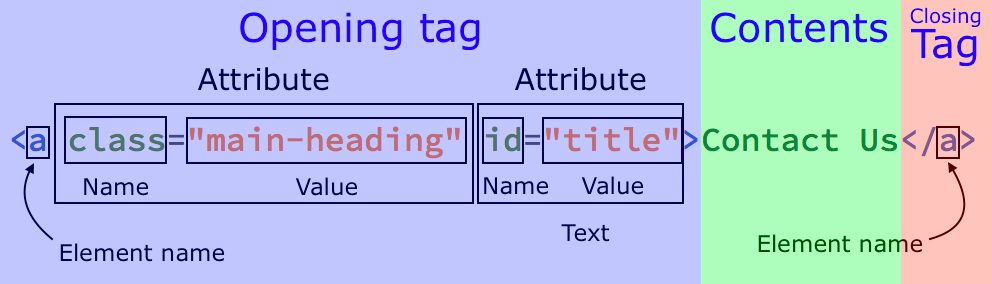
Phew. That might have been a bit confusing, but eventually you’ll get the hang of it. If there’s anything you don’t get you can go back over this article or ask me in the comments. If you liked the article, don’t forget to share with your friends and subscribe to the newsletter. Have fun and I’ll see you next time, where I’ll be talking about the general structure of HTML websites.
Your FREE guide to learning HTML! 🎁
Get it when you sign up for the weekly newsletter: