Links and images are two of the most common elements in HTML. Learn how to use them along with file paths in this article…
In my last article, I talked about some common HTML elements. Two elements that I left out were images and links. But why? Images and links both require an understanding of file paths.
NOTE: I highly recommend reading How the internet works first, as it will help you understand file paths better. Also, to follow along with the previews in this article it would be helpful to have read Practice web development on your computer.
Let’s get started!
Images
Images are added to HTML using the <img> tag. The syntax looks like this:
<img src="https://example.com/photo.jpg">
You will notice that it doesn’t have a closing tag. This is because it does not have any content inside it, so it doesn’t require one. The <img> element always have to have one attribute: the src. The src attribute of the image is the URL to the photo. What? Photos can have URLs? Yup, that’s right. Remember, when you visit a website the server simply sends you an HTML file. Why can’t it send you an image file? For example, try opening this image in your browser:
Let’s get coding! Create a new HTML document in a new empty folder. First, let’s add our basic file structure:
<!DOCTYPE html>
<html>
    <head>
        <title>Links and images</title>
    </head>
    <body>

    </body>
</html>
If you don’t understand the above code snippet, you can check out this article.
Try adding the Code The Web logo image to your web page. Using the information from above, see if you can work out how the code will look:
<!DOCTYPE html>
<html>
    <head>
        <title>Links and images</title>
    </head>
    <body>
        <img src="https://codetheweb.blog/assets/img/icon1.png">
    </body>
</html>
Preview your page. You should see an image! Yay! The only problem is, it looks a bit large. Add width and height attributes to your image element equal to 300px (300 pixels). See if you got it right:
<!DOCTYPE html>
<html>
    <head>
        <title>Links and images</title>
    </head>
    <body>
        <img src="https://codetheweb.blog/assets/img/icon1.png" width="300px" height="300px">
    </body>
</html>
Preview it again - you will see that the image has been scaled down to a nice size - 300px by 300px.
Links
Links are what make the entire internet an internet - links interconnecting different sites and pages. They are made using the <a> tag, which stands for anchor. Let’s say we want to make a link that looks like this:
The link has two things that we need to define - what the link text says, and where it links to. In HTML, the link text is the content within the tag and the URL to link to is an attribute. The above example would be written like so:
<a href="https://codetheweb.blog">Code The Web</a>
The href attribute specifies the link URL, and stands for Hypertext Reference (you don’t need to remember that, it’s just interesting). In your file above the Code The Web image, make a link to this article saying “An article on images and links”. Try and work out the code:
<!DOCTYPE html>
<html>
    <head>
        <title>Links and images</title>
    </head>
    <body>
        <a href="https://codetheweb.blog/links-images-about-file-paths/">An article on images and links</a>
        <img src="https://codetheweb.blog/assets/img/icon1.png" width="300px" height="300px">
    </body>
</html>
Try previewing your code - Oops! It’s on the same line! Let’s quickly add a <br> to fix that:
<!DOCTYPE html>
<html>
    <head>
        <title>Links and images</title>
    </head>
    <body>
        <a href="https://codetheweb.blog/links-images-about-file-paths/">An article on images and links</a>
        <br>
        <img src="https://codetheweb.blog/assets/img/icon1.png" width="300px" height="300px">
    </body>
</html>
Try previewing your code again and click on the link. (note - the reason I made that second code snippet hidden was so you didn’t see it above)
Open links in new tab
What if you want that link to automatically open in a new tab? This is often done to keep users on the website when linking to other websites or articles. You can make a link open in a new tab using the target attribute to _blank. See the example below:
<a href="https://codetheweb.blog" target="_blank">Code The Web</a>
Try making your link open in a new tab - see if you can guess the code:
<!DOCTYPE html>
<html>
    <head>
        <title>Links and images</title>
    </head>
    <body>
        <a href="https://codetheweb.blog/links-images-about-file-paths/" target="_blank">An article on images and links</a>
        <br>
        <img src="https://codetheweb.blog/assets/img/icon1.png" width="300px" height="300px">
    </body>
</html>
Once you are done, preview your code and click on the link. You will see that it automatically pops up in a new tab. How cool is that!
What your code is doing here is it is specifying the target tab for the link to open in - which we’ve set to _blank, meaning that it will open in a new blank tab. Other options for the target attribute are _parent, _self and _top.
Other elements as link content
The content of the link doesn’t always have to be text - it can be HTML. For example, let’s turn the image on your page into a link by wrapping it with a link to https://google.com. See if you can work it out:
<!DOCTYPE html>
<html>
    <head>
        <title>Links and images</title>
    </head>
    <body>
        <a href="https://codetheweb.blog/links-images-about-file-paths/" target="_blank">An article on images and links</a>
        <br>
        <a href="https://google.com">
            <img src="https://codetheweb.blog/assets/img/icon1.png" width="300px" height="300px">
        </a>
    </body>
</html>
Now, when you click on your image it will send you to Google.
All this is fine and well, but what if you want to link to pages within your site or use your own images? Read on below to find out:
Using your own images
What about if you want to use your own image? For this example, download this awesome llama pic and use that.
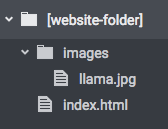
At the moment, your website folder should look like this:

At the moment, index.html should be the file with all your code in it (if you have not set it up this way, do so now). Now, make a new folder inside it called images and save / move / copy your image there as llama.jpg:
Now, it’s time to add the image to your index.html file. But what’s the URL? We are going to use something called a relative URL. A relative URL is a URL relative to the HTML file. The file is currently in your main folder (in these examples its called [website-folder], but it doesn’t matter what it is). Relative URLs do not start with file://, http:// or https://. They just start with a file path, assuming you are in the current folder.
In this case, the image we want is in the images folder, and is named llama.jpg. Because the index.html file and the images folder are in the same folder, we can simply have a url of images to link to the images folder. Because we want to access the image inside the folder, we use the URL images/llama.jpg. This is because it is the path of the image relative to the index.html’s folder.
In your index.html, underneath the Code The Web logo, add the llama image to the page. Try and work out the code:
<!DOCTYPE html>
<html>
    <head>
        <title>Links and images</title>
    </head>
    <body>
        <a href="https://codetheweb.blog/links-images-about-file-paths/" target="_blank">An article on images and links</a>
        <br>
        <a href="https://google.com">
            <img src="https://codetheweb.blog/assets/img/icon1.png" width="300px" height="300px">
        </a>
        <img src="images/llama.jpg">
    </body>
</html>
Preview it. Woaaah! Llamas are cool and everything, but that image is way too big. Try scaling it down like before…
<!DOCTYPE html>
<html>
    <head>
        <title>Links and images</title>
    </head>
    <body>
        <a href="https://codetheweb.blog/links-images-about-file-paths/" target="_blank">An article on images and links</a>
        <br>
        <a href="https://google.com">
            <img src="https://codetheweb.blog/assets/img/icon1.png" width="300px" height="300px">
        </a>
        <img src="images/llama.jpg" width="300px" height="300px">
    </body>
</html>
The problem is that now the llama is stretched. We can fix this by removing the width attribute - that way it will make sure the height is 300px and the width will be scaled down automatically:
<!DOCTYPE html>
<html>
    <head>
        <title>Links and images</title>
    </head>
    <body>
        <a href="https://codetheweb.blog/links-images-about-file-paths/" target="_blank">An article on images and links</a>
        <br>
        <a href="https://google.com">
            <img src="https://codetheweb.blog/assets/img/icon1.png" width="300px" height="300px">
        </a>
        <img src="images/llama.jpg" height="300px">
    </body>
</html>
There we are - our llama is looking much healthier!
Relative paths with links
Relative paths also work with links. Make another HTML file called hello.html in your website folder and put something really simple in it:
<h1>Hello!</h1>
Now, we need to work out what the relative path is. As hello.html is in the same folder as index.html, our path relative to the folder will simply be hello.html. Add a link to your index.html saying hello and linking to that page - try and work out the code:
<!DOCTYPE html>
<html>
    <head>
        <title>Links and images</title>
    </head>
    <body>
        <a href="https://codetheweb.blog/links-images-about-file-paths/" target="_blank">An article on images and links</a>
        <br>
        <a href="hello.html">Hello</a>
        <br>
        <a href="https://google.com">
            <img src="https://codetheweb.blog/assets/img/icon1.png" width="300px" height="300px">
        </a>
        <img src="images/llama.jpg" height="300px">
    </body>
</html>
I added a <br> for readability, but you don’t have to. Preview your code and click on the link. Congrats, you have mastered relative URLs!
Conclusion
Cool! Now you know about two of the most common tags in HTML - <img> and <a>, and have an understanding of file paths and relative URLs! If you liked the article, don’t forget to share and subscribe.
If you need any help or have something to say, tell me in the comments. Have fun, and I’ll see you next time!
Your FREE guide to learning HTML! 🎁
Get it when you sign up for the weekly newsletter: